Flux V220 log
Summary
This page details how I came to buy my Flux V220 CLWB and what
modifications etc. I have made to it (jump to
most recent entry).
Or << Back to Flux V220 introduction page.
April 2001 - SPEZI test ride
One of the bikes that I had tried at the SPEZI 2000 was the
Flux
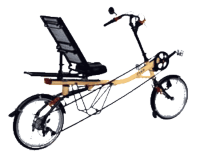
V220 This is a CLWB city/touring recumbent with a fairly high seat
(68cm (27in)), above seat steering and dual 406 (20in) wheels. What I really liked about
this bike was the easy handling (by which I probably mean that it handled
more like a diamond frame bike!!). I much preferred it to both its' sister bike
the
Flux V200
(16inch front wheel) and the Bike E (company now defunct).
But at the time I was looking at Lowracers !!
By the time I went to SPEZI 2001 I was getting dissatisfied with
using my Pashley/Moulton
APB for commuting/trailer hauling (I was very happy with the
bike but the problem is the non-recumbent rider position!!). So I
tried the V220 again and still liked it. When I got back from the
SPEZI I started thinking about and researching the Flux V220 and
similar bikes.
12th July 2001: buying one
Having decided that I would like a V220, I found out that one of the
local bike shops (Luftpumpe)
stocked the Flux V220 and had one available for a test ride. So I had another
go on it, still liked it and bought that one for a small discount ("shop
soiled" but it looked OK to me) (list price 2800DM, shop price 2589DM,
I paid 2429DM). So I rode it away the next day :-)
(see price conversions below)
July/August 2001: Fine Tuning
 This process usually takes me months !!
- Set the seat the most upright of the 3 positions to allow for the best
on-street view. (The latest seat model is infinitely variable but mine
has 3 bolt holes - see pictures.)
- Fitted the excellent Weber coupling to the
rear axle to haul our Chariot
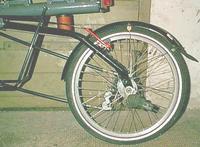
Chauffeur child trailer but had to remove the rear prop-stand to
do so :-( Photo with Weber coupling fitted right
vs. photo with original stand fitted)
- Fit Cateye Mity 2 cycle computer.
- Fit longer rear mudguard to protect the trailer occupants from road spray.
(Bike already came with lowriders, mirror, chain-tubes and dynamo lights
as standard.)
August 2001: Child-seat Fitting

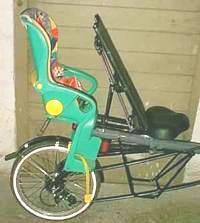
- As can be seen from the photos the horizontal seat support extends
a long way backwards behind the seat.
It also has a cross piece with two bolt holes. I found that this exactly
fits our Romer Jockey child-seat with the (heavy steel) mounting bracket
removed :-)
- With the 406 rear wheel the child seat is approx. 10cm (4in) lower
than when fitted to a standard 700C wheeled bike.
- Now I have to see how the bike handles with a 15kg (33lbs) child aboard
(seat is rated to 22kg (48lbs)).
August 2001: Lower Gears
The supplied gears were a Sachs 3x7 hub with a 12 to 28 block and a 48 tooth chainring
giving gears from 24 to 103 inches.
This is too high my round town / trailer pulling with 2 children (this trailer combination gives
an extra 43kg (100lbs) of dead weight with all the aerodynamics of a parachute !!).
I never used the top set of 7 gears, even without the trailer. And even on the short
ride to the kindergarten I was down to the lowest gear (especially as the ride is so short
I have not had time to warm up).
So I went into my junk box and came out with
an old Stronglight 99 triple with 28/38/48 rings. My gear chart showed that with the
38 ring I would drop the whole range by one hub gear (so now top hub gear range would be the
same as on the middle hub gear range with the original 48 tooth.)
So now I have a Sachs 3x7 hub with a 12 to 28 block and a 38 tooth chainring
giving gears from 19 to 82 inches. This works very well for me: the 19 inch is
about as small as I can ride and still keep upright, and I still rarely use the
82 inch gear. For normal daily use I do not need the lower set of gears.
A (pleasant) side effect of using using the old Stronglight chainset is that the
Q-factor (the distance between the pedals) is reduced from 159 to 134 mm. This definitely
felt more comfortable.
November 2001: Stem adjustment
(First to explain the stem fitted to the Flux: a long, straight tube clamps into the
steerer tube just above the headset. This tube has height adjustment, but not angle adjustment.
Into the top of that goes a standard, adjustable-angle stem that then clamps the handlebars.)
I had been playing around with the adjustable stem provided with the bike and with
the handlebar angle; trying to get the perfect position !! I achieved the handlebar angle that
I liked quite quickly, but the stem position was more of a problem.
I had decided that I wanted the handlebars in a position
so that in sharp, slow, corners I could still hold on to both ends of the handlebars
properly. The stem adjusts up to maybe 70 or 80 degrees (close to vertical), but that was not quite
enough for me. I tried reversing the stem, but that brought the bars too close:
I wanted the bars in that 'dead' vertical spot :-(
Out of interest I measured the outside diameter
of the steerer tube and it is exactly right for fitting an "ahead" type stem.
So out went the 500g adjustable stem, and in came the
Roox
"0" stem (220g but not cheap!)
This stem places the handlebars directly above the steerer tube (i.e. 0mm of reach)
and gave exactly the position I wanted !!
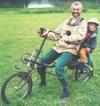
(The stem can be seen on the photo below (of me and Fiona) as the silver block
connecting the black stem with the black handlebars.)
SPEZI 2002
 I noticed at least 3 changes made to the V220 since mine was built
(see photo opposite: taken myself at SPEZI 2005):
- Seat mount: this has been greatly improved in terms of quick adjustability
fore/aft: mine is quite stiff to move but the new one is very smooth.
- Rear "triangle": (really just a single, bent, tube back)
has been beefed up with an additional tube running from the rear
dropouts to the suspension pivot point to form what looks, from the
side, like a very squashed diamond. (UPDATE March 2006: it finally
appeared in the Flux website but
click on the link to see more and you get the old design ! (direct
link)
- Longer front mudguard: good idea, but the back is still a bit short !!.
Long weekend away June 2002
 On a long weekend away to a farm in the Odenwald we took all the bikes with us on the car.
- On the car roof rack: The Flux fitted fine on my old tandem
(because of the long wheelbase) roof rack. This has channels for the
front and rear wheel plus two upright arms that hold the bike
upright. And I always use lots of additional straps :-)
-
With the child-seat:
This was the first time I had tried the
child-seat out on the Flux (see photo).
- I was not too optimistic and really thought I would always prefer the
trailer, but there was no way we could fit
3 bikes, 4 people, luggage and a trailer on/in our little Peugeot 205.
- But the child-seat on the Flux worked out fantastically.
My daughter Fiona (aged 3) loved it: I guess because she is higher
up and closer to Daddy !!
- I loved it because it actually had (unexpectedly) no effect at all
on the bike handling (compared with adding a child-seat to an upright that tends
to make it more "whippy") and it was great being able to talk easily with Fiona
as we cycled along.
- Note however that (on my bike at least) there is only space for the child's'
head if the seat is in the most upright position and the Romer Jockey is in the
reclining position (another Flux seat and/or child seat may be easier).
- My partner, Doro, although a long-time cyclist, had never ridden a recumbent
but she had a go on the Flux on this holiday.
Even though the seat was much too far back from the pedals for her
she had a 10 minute ride and loved it. She especially liked the relaxing "head up"
position.
Also done during the First year
- Replaced part of the (Mirrycle)
mirror arm with a length of square section aluminium to
ensure that the line of sight clears my arm. Flips up and over for storage.
- Short experiment with 140mm cranks (170 or 175 are standard).
I never got used to starting with these:
you basically get one push on the pedal to accelerate up to a speed when you
can put the second foot up onto the pedal. With shorter cranks you get less of
a push. I would consider giving this more time if I fitted them on a trike.
A 'downside' of this kind of experiment is that if you like them you may have
to fork out for new cranks for all
of your bikes !! Also standard cranks can feel very strange after some time
on short cranks. (to be expanded...)
- I used a plastic 'top box' bolted onto the rear rack for some months
(side view,
top view)
(from KLICKfix, 25 litres).
Advantage is good waterproofing and also some security (depending on the lock).
This meant that I would leave my tools in the box, instead of carrying them
everywhere !! I went back using just a bag when I started using my
recumbent trike sometimes
and I could then just swap the bag between bikes. (to be expanded...)
- Move the seat base slightly back so that my pelvic bones sit more in the middle
of the seat base. Flux do not provide a proper method to do this but the seat base
is a panel of wood so it is easy to drill 3 more holes further forward/backwards !!
July 2002: how it's going 1 year later
In short: excellent. Since I bought the Flux I have only used a upright about
twice: both times just a short cycle to a local pub.
The 2000 miles (3200km) logged on the V220 have been great; mostly around town
and including lots of trailer towing. And it is very relaxing.
- Replacement ?: No plans yet: but if the Flux "disappeared" tomorrow I would
immediately buy another CLWB.
- But first I would like to test ride the new
HP Velotechnik Spirit
first, but otherwise I would immediately order another Flux V220.
(In July 2002 the Spirit is a higher looking specification and
costs "from" Eur1695
(no details on the website so I do not know if the base price includes
the disk brakes, full suspension etc. that are shown in all the pictures),
whilst the Flux V220 is Eur1555)
- And I would also like to test ride the
BEVO-Bike
a dual 406, front wheel drive, twist chain design. I have been interested in the
design for some time now, and it also got a good write up in
Velovision Magazine.
- Winter: I rode through the last winter with only one low speed spill
(no serious injury to the bike or myself).
- The transmission
is, of course, now a bit gungy (must give it it's first clean one day !!) and I would still like
to make some kind of cover to keep at least the worst of the mud and salt off.
- But I have also bought something I have been thinking of for some time: a
recumbent trike :-)
- Also the cheapo looking dynamo died; I have replaced it with a better quality AXA model.
Winter 2002/3: New tyres
The original rear tyre had worn through so I replaced both with the very nice
Continental Top Touring 2000 tyres. These take a higher pressure then the original
tyres and provide a slightly harder ride but this is OK for me (and bearing in mind the rear
suspension). I find the comfort still fine for cycling, even down rough tracks through the
local woods.
Problems:
- These tyres have a smaller outside radius than the original ones so I really need to lower
the mudguards. This is easy for the stays, but the bracket that fits to the frame will
not go low enough. I will have to add some extenders.
- Also the bottle dynamo does not now meet the tyre at the correct radius, even at the end
of the adjusting slot. So I replaced it with a
FER 2002 dynamo I had from my
APB (2004: now at Aufa).
It just clears the inside of the fat forks !!
Spring 2003: New tyres !!
I got tired of the (perceived) harder ride of the Conti TT (Top
Touring) 2000. So I replaced them with some nice fat ???(check make)
and put the bottle dynamo back on again. Although these tyres are the
same nominal diameter as the original tyres (42mm) they look huge. But
they are comfortable !!
July 2003: Replace seat base
The seat cushion cover (actually bonded to the foam itself)
had started to develop cracks on the side a few months ago but it never became a functional
problem as the cushion itself is closed-cell foam. But I finally decided it looked a bit
tat so I bought a new one from
Pedalkraft Spezialraeder. It is a slightly
different shape, but still very comfy !!
Sept 2013: Fit SA X-RF8 hub gear
(The bike is still seeing some use, mostly for local rides at an easy
pace with my wife. We prefer the car-free routes as much as possible
which round here often means forest tracks. These are difficult with a
trike as they are usually firm where the forester's vehicles travel:
effectively for bikes a single track in each direction. Also the
higher seat of the Flux is more sociable than a trike !!)
The original gears were pretty worn out and a pain to change (often
2-up then 1-down !) and although it may have been possible to
clean/renovate them I fancied hub gears ! They would give an easier
change, and more reliability, and the slight extra inefficiency would
not be noticeable for this usage. Modern hubs allow a wider range of
closer gears, and to get the closest (without the price tag of a
Rohloff) I chose the Sturmey Archer X-RF8 14% steps except the first
and last which are 30% and ordered a wheel buit by
SJSC. The hub is a bit narrow, but the axle was long enough
when I padded with a nut on each side. I kept the rear derailleur to
use as a chain tensioner (essential with rear suspension). Fitting
went without a hitch, and the gears work great. Some grinding, esp. in
4th, but they do not have many miles in yet, so it may smoothen out ?
Late 2013 or early 2014: Refit original, red, stem
On other machines I had been experimenting with a longer seat-to-pedal
position (also longer than the usually recommended
heal-on-the-pedal-leg-nearly-straight) and had good results (esp. for
my knees !). Moving the Flux seat back to match this meant that the
bars were too far forward on the Roox 0 stem, so I refitted the
original Flux stem, but reversed and max. forward. This gave a good
hand position but I am still not used to the change in handling (not
many miles done yet !)
May 2015: fit hub dynamo and LED front light
Buy pre-built front wheel with Shimano Hubdynamo DH3N30 406-19 on eBay.
June 2020
Still in occasional use (town and slow weekend rides with my
wife). Very happy with hub gear.
To Do
-
Fit Air Zound 2 (This is designed to fit on straight MTB handlebars: as
the Flux bars are bent back the horn would point sideways 45 degrees so
I need to apply a bit of ingenuity.)
-
Find some way to fit a prop-stand (either near the rear axle or onto the
lowrider pannier rack). Although in practise I always find a convenient wall,
and when the trailer is fitted I think a wall is safer for the bike !!
-
More complete chain enclosure. (I envisage some kind of box covering the
rear block and changer.)
-
It would be nice to have a locking box fitted somewhere to hold tools,
waterproofs, etc. (inside the lowrider pannier rack ? wood ?)
<< Back to Flux V220 introduction page |
<< Back to Front page |
Email me

 This process usually takes me months !!

 I noticed at least 3 changes made to the V220 since mine was built
(see photo opposite: taken myself at SPEZI 2005):
 On a long weekend away to a farm in the Odenwald we took all the bikes with us on the car.